Upgrading the 50MHz Rigol DS1052E to the 100MHz DS1102E with simple serial commands on ubuntu
03 Apr 2010This is a mod that has been covered elsewhere but I feel it's so good it's worth me covering here. I have to thank Dave at the eevblog for bringing it to my attention and the other people on the forums who actually did the hard work in finding this. Basically the mod makes your Rigol DS1052E think it's a DS1102E by changing the model number in the firmware thus changing the bandwidth from 50Mhz to 100Mhz with only 3 or 4 serial commands.
To perform this you'll need a computer with a serial communication program (here we'll be using ubuntu and cutecom), a straight through serial cable, not a null modem cable and obviously your Rigol DS1052E.
So lets get started: If you don't already have a program to communicate with serial devices you should install cutecom as it's the simplest for this job as it allows us to easily use the correct settings for communication.
First you need to connect you oscilloscope to your computer with the serial cable (and possibly a serial to usb adaptor).
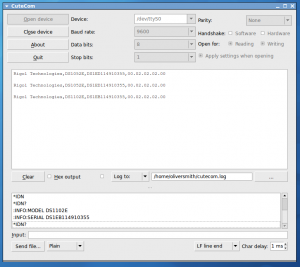
Then open cutecom and connect to oscilloscope, in my case using a real serial port it was /dev/ttyS0 but if using a usb to serial adaptor it may be /dev/ttyUSB0. The other settings you need are 9600 baud, 8 bits, 1 stop bits, no parity, no handshake and finally to change the line end to LF line end so a line feed is sent after pressing return.
Now you’re connected we need to get the current serial number, we do this by issuing the command *IDN?
Assuming nothing looks odd there we can go on to change the model number to DS1102E using the command :INFO:MODEL DS1102E and the serial number needs to be amended changing ED to EB using the command :INFO:SERIAL <new serial>
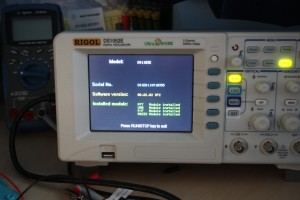
After that reboot your scope and you should have a 100MHz version for a very small price! This can be verified using the *IDN? command again and it should show the new model and serial number or going to utility>system info and it will show the screen as above.
Now it's all done you need to perform a self calibration, again in the utility menu, then bask in the glory of the now even better value DS1052E!
Obviously while I have tested this myself I take no responsibility for anyone who follows my instructions and bricks their scope, if you don’t know what you’re doing, don’t do it.

