An MQTT/Websocket based Thermometer using the html5 meter tag
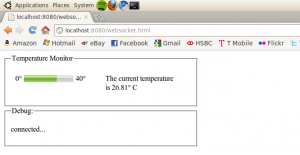
05 Sep 2010In this post I will show the latest in a line of mini examples using html5 and websockets - an example of how future home monitoring dashboards should be created. At present they commonly use a combination of flash dials and JavaScript canvasy bits and pieces to create representations of data obtained via ajax. This has the inherent disadvantage that the browser polls the server rather than the server pushing values to the browser when available. Also there is very little in the way of accessibility as far as canvas and flash are concerned. In this post I will show a simple example of using data via a web socket and displays it via the meter.
While nothing demonstrated here is rocket science it’s something that’s not being focused on enough, developers seem to be getting lost in the shinyness of the canvas and forgetting the built in meter functionality along with it’s inbuilt accessibility. Having said all that it is only displayed by the more bleeding edge browsers and things may pick up as the html spec matures.
HTML5 Meter
Of the new features introduced by the HTML5 spec one that particularly sparks my interest is the meter tag, in the words of the spec:
"The meter element represents a scalar measurement within a known range, or a fractional value; for example disk usage, the relevance of a query result, or the fraction of a voting population to have selected a particular candidate."
![]()
However in simple terms (at present) it just produces a single bar meter with the length of the bar defined by the value attribute and maximum and minimum values defined thus, high and low values can also be defined which effect the colour of the bar depending on the value. They seem to have omited the possibility of dynamic content from their main definition. For browsers which don’t support the meter tag fall-back content can be inserted before the end tag.
<meter min='0' max='40' value='20' id='meter'></meter>The purpose of explaining this here is, as will most html elements, the attributes can be manipulated with javascript so here I will use a number sent via a web socket to set the value attribute of the meter (and also update the text).
Server Side
On the server I will be using pywebsocket and it’s included web server to subscribe to an MQTT broker topic which contains temperature data. The code is identical to that used in my previous example. The data could however come from any source which provides numerical data.
Client Side
The code used here again is very similar to my previous examples except values are take from the body of the message and then given to the value attribute of the meter element (using jquery). I have added some CSS to make it look a bit nicer too:
<!DOCTYPE html>
<html>
<head>
<style type='text/css'>
fieldset {
width:400px;
}
#debug {
height:70px;
width: 400px;
display: block;
}
#msg {
width: 160px;
height:40px;
float:left;
padding:20px;
}
#meter2 {
float:left;
width: 160px;
height:40px;
padding:20px 20px 20px 10px;
}
meter {
padding:0 5px 0 5px;
width:110px;
}
</style>
<script src='http://ajax.googleapis.com/ajax/libs/jquery/1.4.2/jquery.min.js'></script>
<script>
$(document).ready(function() {
/* Define handler for websocket debug information*/
function debug(str) {
$('#debug_txt').html('<p>'+str+'</p>');
};
/* Create a websocket connection */
ws = new WebSocket('ws://localhost:8080/echo');
/* Define websocket handlers */
ws.onmessage = function(evt) {
//set the text value
$('#temp').text(evt.data);
//set the value of the meter
$('#meter').attr('value', evt.data);
};
ws.onclose = function() {
debug('socket closed');
};
ws.onopen = function() {
debug('connected...');
ws.send('Hello.\n');
};
});
</script>
</head>
<body>
<fieldset><legend>Temperature Monitor</legend>
<div id='meter2'>
0°
<meter min='0' max='40' value='20' high='90' id='meter'>20</meter>
40°
</div>
<div id='msg'>The current temperature is <span id='temp'></span>° C</div>
</fieldset>
<fieldset id='debug'><legend>Debug:</legend><div id='debug_txt'></div></fieldset>
</body>
</html>Moving On
Hopefully in the future developers both of browsers and web applications will make use of the meter element rather than non standard solutions especially once the html5 spec is finalised and there is (hopefully) going to be proper CSS hooks available to create more beautiful meters.
