MQTT Caller Display - Hacking the BT Caller Display 50 Serial Port
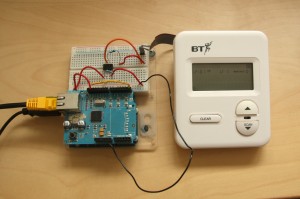
02 Oct 2011This post describes a recent project I completed to display caller id information for incoming calls on my computers. The project uses a BT Caller Display 50 connected via an optoisolating bridge to an arduino with an ethernet shield. When an incoming call is received the telephone number is transmitted via MQTT to a python client on any computer I happen to be using at the time. This project is a great example of someone putting great effort into being lazy, the caller id data is alredy displayed on my phone but the phone generally resides in the next room so this avoids me needing to run for stupid cold callers. Initially I’d wanted to do this project just using the arduino, which may have been possible but using the CD50 makes it a huge amount easier.
UK Caller ID Protocol
The caller id system in the UK transmits the callers telephone number (and date and time) as a burst of 1200 baud serial between the first and second ring, this is then decoded and displayed.
Hardware
The hardware is very simple as the CD50 has an internal serial port so all that’s required is to safely isolate the phone line from any sensitive computer systems with an optoisolator.
CD50
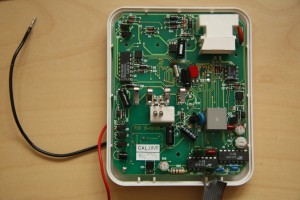
The CD50 has been hacked to provide serial output in a couple of projects before, however all the pages documenting this have long gone (the unit is around 10yrs old). Internally the unit uses two EXAR XR-2211 FSK Demodulator/ Tone Decoders, one to detect the presence of the signal and one to decode it (allegedly). In this configuration this means serial data is outputted on pin 7 of the left chip (see below)
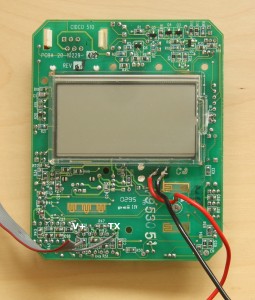
If you wish to power the unit from a source other than the internal batteries this can be easily achieved by connecting to the points below the LCD as shown, this must be done with caution as the unit will not work if connected to mains earth as used by many PSUs it must be fully isolated.
Bridge
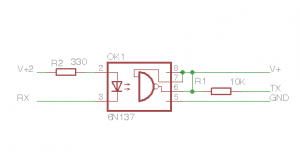
The optoisolating bridge protects connected equipment from high voltages which can occur in telephone lines, here I used the Vishay 6N137 device as shown (I chose the Vishay as it requires very low current). I powered the CD50 side using the power supply on pin 1 and the arduino side using the internal power supply from the arduino. The 6N137 was sourced from Farnell.
Arduino
The arduino simply receives the serial data using its hardware serial port (I had mixed results with a software serial port), parses the telephone number from the output and then sends it in an MQTT message it would be simple to pass it using over usb back to the computer if you are not using MQTT too.
Software
The serial output from the CD50 has some apparently (but probably not) random letters appended to the beginning of each transmission and the data and time directly in front of the telephone number so once messages have been received this must be parsed at some stage, I choose to do it on the arduino.
All code is also on my github.
Arduino
I wrote this simple sketch to parse and send the data, it requires the Arduino MQTT Library - http://knolleary.net/arduino-client-for-mqtt/.
/*
 * Quick arduino sketch to recieve a telephone number over
 * serial (1200 baud using hardware serial) and broadcast it
 * using MQTT.
 *
 * This sketch is part of a project to read caller id data from
 * a BT Caller Display 50.
 *
 * @author Oliver Smith
 *
 */

#include <SPI.h>

#include <Ethernet.h>

#include <PubSubClient.h>


byte mac[]    = { 0xDE, 0xED, 0xBA, 0xFE, 0xFE, 0xED };
byte server[] = { 192, 168, 1, 2 };
byte ip[]     = { 192, 168, 1, 8 };

PubSubClient client(server, 1883, callback);

const int bufferLength = 19;      //Length of buffer

char stringBuffer[bufferLength];  //Buffer to hold input

int stringIndex = 0;              //Index of next free element in buffer


void setup()
{
  Serial.begin(1200);

  Serial.println('Serial Connected');

  Ethernet.begin(mac, ip);
  Serial.println('Network Connected');

  if(client.connect('arduino'))
  {
    Serial.println('MQTT Connected');
  }

}

void loop()
{
  while(Serial.available() && stringIndex < bufferLength)
  {
    char inputChar = Serial.read();

    //Check if the char read is a number

    if(inputChar  >= '0' && inputChar <= '9' )
    {

        //Add number to buffer

        stringBuffer[stringIndex] = inputChar;

      //Serial.println(stringBuffer);

      stringIndex++;
    }
  }

  //If the buffer is long enough

  if(stringIndex == bufferLength)
  {
    Serial.println('Buffer full');
    //remove initial irrelevant digits


    String output = String(stringBuffer);
    String telephoneNumberString = output.substring(8);

    char charBuf[12];
    telephoneNumberString.toCharArray(charBuf, 12);

    //Send the telephone number back over serial for debugging

    Serial.println(charBuf);
    client.publish('topic',charBuf);

    stringIndex = 0;
  }
}

void callback(char* topic, byte* payload,int length) {
  // no action required

}
Example Python Client
I used a simple MQTT subscribe script with pynotify in ubuntu to display messages on the desktop, details are available in my previous post: First steps using Python and MQTT
I’d rather not show it working as that would give away my telephone number! But it does work, so far 100% of the time.
Getting There
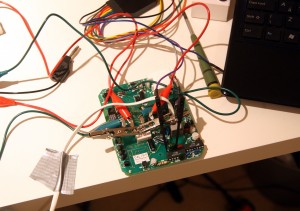
Initially there was lots of head scratching, probing and logic analysing to check the information I’d read:
History
The circuit used seems to be a duplicate of a previous project which was documented at:
http://www.amarok.demon.co.uk/dl/cd50_mod/
and
http://www.photon.dyndns.org/projects/btcd50conversion/old_index.html
However these pages are long gone and the wayback machine only has the text not the images detailing the hardware. I never managed to find a copy of them so I built my own version.
